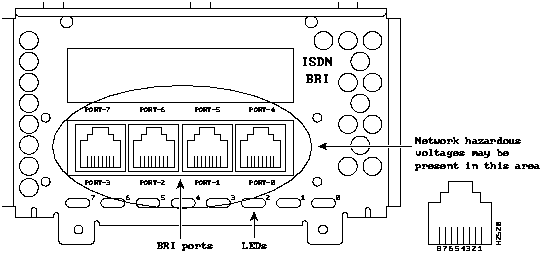
The BRI network processor module (see Figure 4-25) supports four BRI ports. Each BRI port is an RJ-45 8-pin connector. Use an appropriate cable to connect the BRI module directly to an ISDN through an ISDN CSU/DSU called the NT1. The common carrier will provide the NT1 connection, except in North America, where the NT1 is owned by the customer.
Figure 4-25 Four-Port BRI Network Processor Module Ports
The specifications for the BRI cable are given in Table 4-9.
Table 4-9 BRI Cable Specifications
| Parameter | High-Capacitance Cable | Low-Capacitance Cable |
|---|---|---|
| Resistance (@ 96 kHz(1)) | 160 ohms/km | 160 ohms/km |
| Capacitance (@ 1 kHz) | 120 nF(2)/km | 30 nF/km |
| Impedance (@ 96 kHz) | 75 ohms | 150 ohms |
| Wire diameter | 0.024" (0.6 mm) | 0.024" (0.6 mm) |
| Distance limitation | 32.8' (10 m) | 32.8' (10 m) |
Using the appropriate cable, connect the BRI port to the ISDN through the NT1. The common carrier will provide the NT1 connection worldwide, except in North America, where the NT1 is owned by the customer. The NT1 is an ISDN CSU/DSU.
![]()
The BRI network processor module supports pointtopoint operation at Layer 1 of the Open System Interconnection (OSI) reference model. Only one source (the transmitter) and one sink (the receiver) are actively transmitting at any time in each direction at an S interface (CCITT specification I.430 section 3.1). The BRI module does not support a pointtomultipoint wiring configuration. Because the BRI module does not support pointtomultipoint configuration, D-channel access procedures are not implemented.
The BRI interface port pinout is shown in Table 4-10.
Table 4-10 BRI Port Pinout (RJ-45)
| 8 Pin(1) | TE(2) | NT(3) | Polarity |
|---|---|---|---|
| 3 | Transmit | Receive | + |
| 4 | Receive | Transmit | + |
| 5 | Receive | Transmit | -- |
| 6 | Transmit | Receive | -- |
![]()
Take the following steps to construct an external loopback RJ-45 connector, which is useful for isolating hardware problems on an individual BRI port:
With the loopback RJ-45 connector plug installed in a BRI port, use the test interface command to verify that the hardware is functioning correctly.
![]()
Take the following steps to power up the router:
![]()
 Siden blev sidst opdateret 1. aug. '96 af
rvinge@daimi.au.dk
Siden blev sidst opdateret 1. aug. '96 af
rvinge@daimi.au.dk